Chicago Digital Sandwich Photos
|
Directions
Firstly, in case you are not familiar with a sandwich print, it is an image made from printing two negatives at the same time. This a traditional film, enlarger and darkroom process you may have done in the Film Photography class. To get started you will need two pictures that you think will work well together. This is somewhat of a trial and error process to find interesting combinations. Different images using different LAYER BLEND MODES will give different results. Experiment with different images and different layer Blend Modes. You will create a total of 2 sandwich prints from our Chicago field trip photos. |
Step 1
Open Photoshop, and the open up a photo from our field trip to Chicago you already have saved.
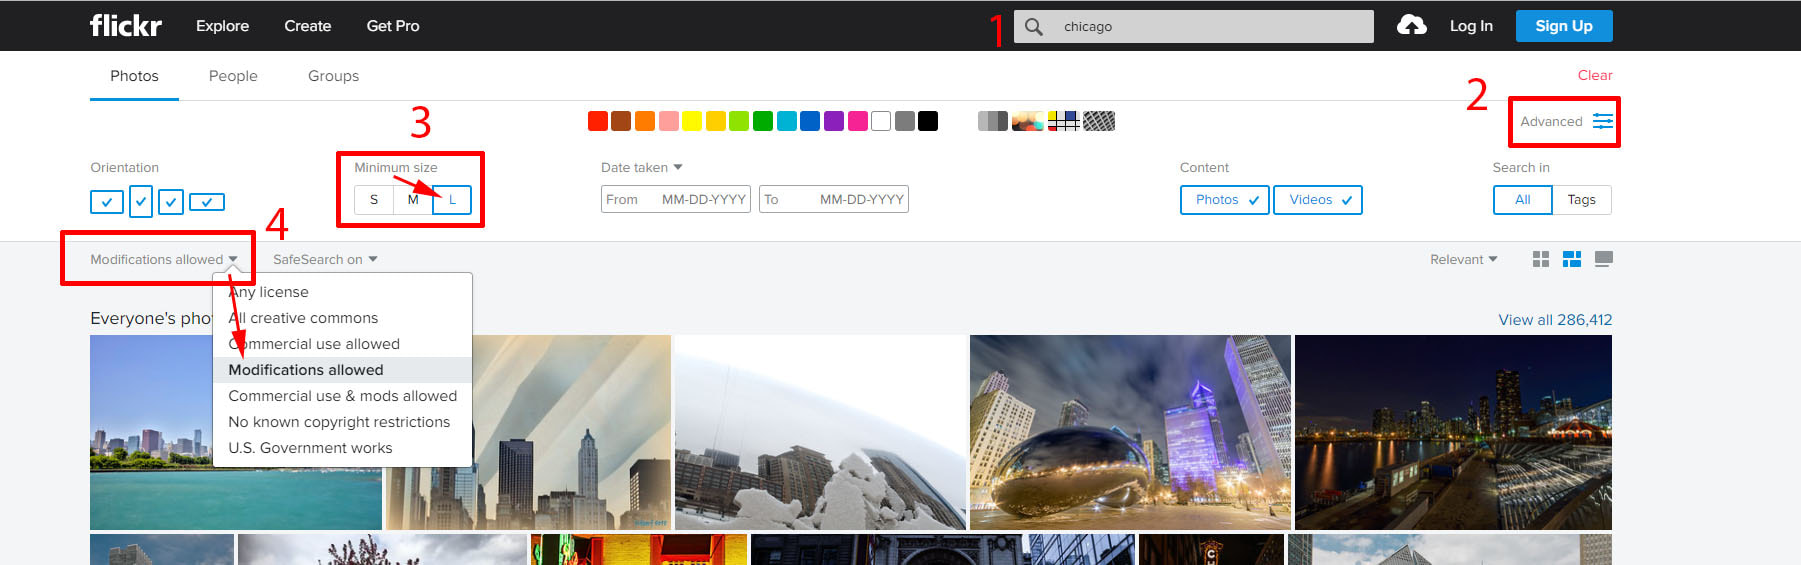
NOTE: If you did not go the field trip to Chicago, photos must be taken from the Advanced Search on Flickr -
1 Search: Chicago
2. Advanced Tab
3. Minimum Size L
4. License > Modifications allowed
Open Photoshop, and the open up a photo from our field trip to Chicago you already have saved.
NOTE: If you did not go the field trip to Chicago, photos must be taken from the Advanced Search on Flickr -
1 Search: Chicago
2. Advanced Tab
3. Minimum Size L
4. License > Modifications allowed
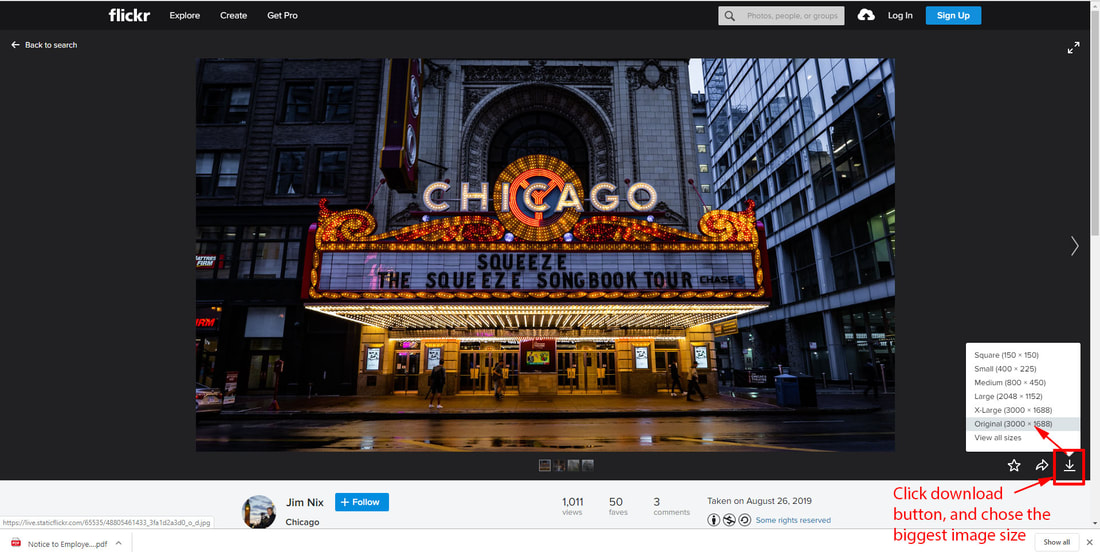
Select an image you want.
Click the Download button and chose then biggest image size.
Click the Download button and chose then biggest image size.
|
Step 2
Open another (a second photo) from our field trip to Chicago. NOTE: If you did not go the field trip to Chicago, photos must be taken from the Advanced Search on Flickr - Search: Chicago |
Step 3
Use the Move tool to drag this image (holding down the shift key) into the first image you opened.
Resize if needed to make the images fit.
You could also add a Layer Mask on this top layer and hide specific parts of the image you don't want visible.
Use the Move tool to drag this image (holding down the shift key) into the first image you opened.
Resize if needed to make the images fit.
You could also add a Layer Mask on this top layer and hide specific parts of the image you don't want visible.
Step 4
Experiment with changing different Blend Modes on this top layer.
Experiment with changing different Blend Modes on this top layer.
Step 5
Save this on your Google drive as LayerSandwich_1.psd
Now save this as JPG file as well.
File Menu > Save as > LayerSandwich_1.jpg to your Google Drive folder
Step 6
Do a second project in the same manner, but use different photos this time, but this time make this finished image a B&W image using an adjustment layer.
Save this on your Google drive as LayerSandwich_2.psd
Now save this as JPG file as well.
File Menu > Save as > LayerSandwich_2.jpg to your Google Drive folder
Step 7
Turn in the LayerSandwich_1.psd, LayerSandwich_2.psd, LayerSandwich_1.jpg and LayerSandwich_2.jpg into Google Classroom.
WORTH 100 Points
